| Table of Contents |
|---|
...
You also can set up a saved sorting which will be present every time you open this list:
...
Configure columns in task and process instance lists
...
Column view for showing process instances
Column | Description |
|---|---|
Name | Process instance name. |
Actor | The responsible person for the current task of this process instance. |
Group | The group that is responsible for the current task of this process instance |
Remaining time | If a task has a time constraint in which it needs to be finished, the time until the time runs out is displayed here. |
Start | The Start time of the process instance |
End | The End time of the process instance on the condition that it is finished. |
Process | Process definition name. |
Calculated End | The 'Calculated End' is calculated from the start date of the process instance and the sum of the prescribed (or if available the actual) processing time of each task. Please refer to CPM for further details on this topic. |
Scheduled End | If a 'Scheduled End' date is specified, it will be displayed here. |
Index 1 - 20 | These columns contain special information that can be individually defined for each process. |
Creation user | The user who started the instance. |
Creation group | The group which started the instance (optional). |
Documents | Clicking on this symbol opens the menu through which uploaded documents can be accessed. Additional documents may also be uploaded by the user. Please refer to Documents for further details on this topic. |
Notes | This symbol grants access to related notes. |
Form | This symbol opens the |
Form. | |
Status | This shows a light-symbol, which indicates the current temporal progress of an instance. Please refer to Critical Path Method (CPM) for further details on this topic. |
Column view for showing tasks
Column | Description |
|---|---|
Task Name | In this column, the name/description of the task is displayed. |
Actor | If the task is assigned to a user it will be displayed here. |
Group | If the task is assigned to a group it will be displayed here. |
AdHoc Task | This column indicates whether or not the task is an AdHoc task If so, the value is 'Yes'. |
Process | This column shows the process definition to which the task belongs. |
Process Instance | This column shows the process instance name to which the task belongs. |
Activity | This column shows the activity name to which the task belongs. |
Index 1 - 20 | These columns contain special information that can be individually defined for each process. |
Due date | This is the date on which the task should be completed. It is calculated from the start date (or if available from the desired start time) and the processing time (considering Business Calendar). |
Creation time | Here, the date and time at which the task was issued are displayed. |
Remaining time | If a task has a time constraint in which it needs to be finished, the time until the time runs out is displayed here (considering Business Calendar). |
Elapsed time | Here the time since the creation of the task is displayed (considering Business Calendar). |
Links | Clicking on this symbol opens the menu in which task-relevant links are displayed. |
Documents | Clicking on this symbol opens the menu through which uploaded documents can be accessed. Additional documents may also be uploaded by the user. Please refer to Documents for further details on this topic. |
Notes | This symbol grants access to related notes. |
Form | This symbol opens the |
Status bar | This shows a colored progress bar, which indicates the timely progress of an task. |
...
Export task and process instance views
...
task name
assigned actor
assigned group
whether it is an AdHoc Task or not
process definition name
process instance name
activity
index fields
creation time
remaining time
elapsed time
amount of attached links
amount of attached documents
amount of notes
whether there is a smartform aorm available or not
status
To create an task overview export to Excel, do the following:
...
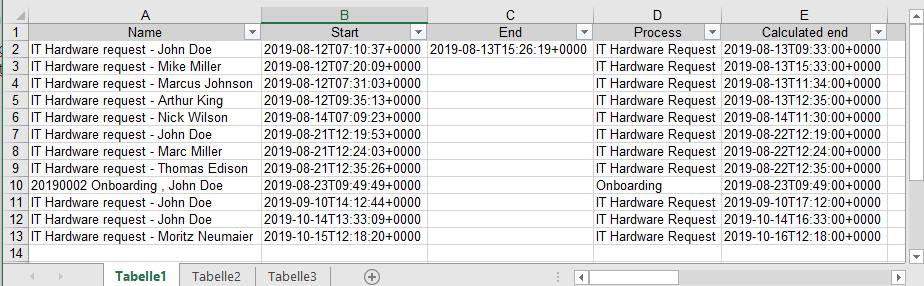
process instance name
start date
end date, if available
process definition name
calculated end
scheduled end
index fields
amount of attached documents
amount of notes
whether there is a smartform form available or not
status
To create an instance overview Excel export, do the following:
Click on the automation icon on the toolbar on the left hand side. Select 'My process instances' in the Side-menu and select any instance view, e.g. 'Started process instances'.
Select an overview in the menu on the left side. For creating an instance overview, click on the download icon on the right side. The popup 'download as excel file' appears.
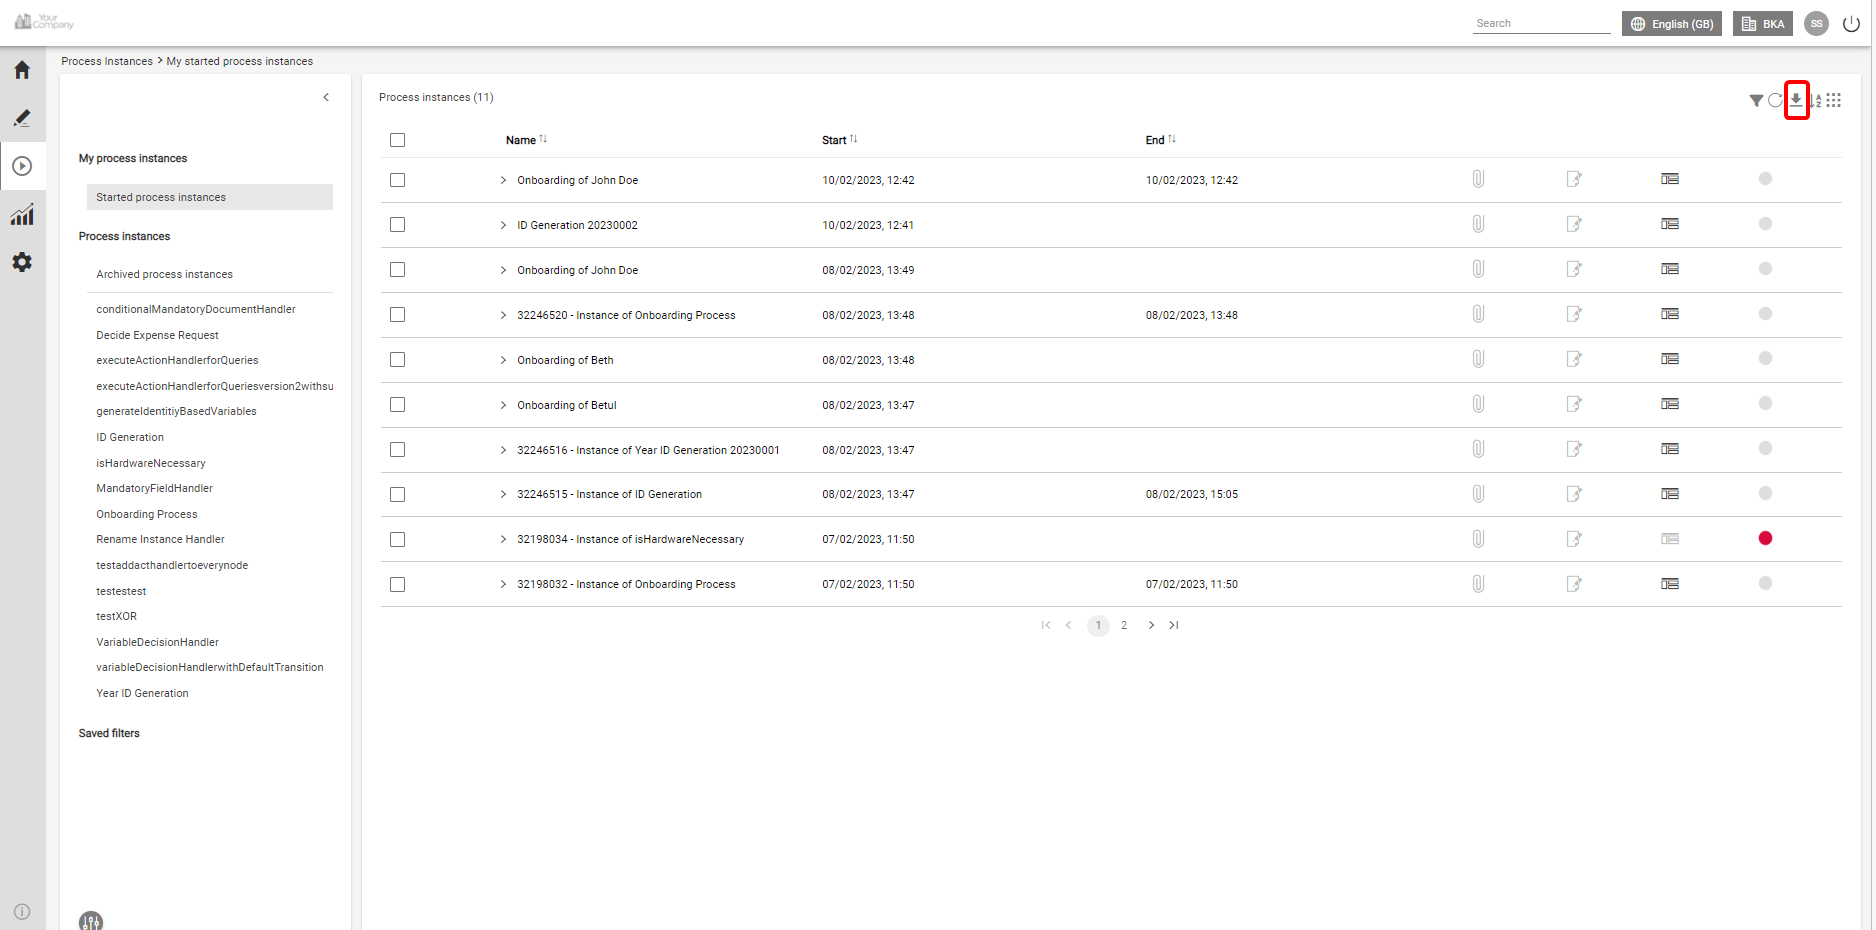
Please select a storage path and open the Excel file.
...
Filters
A user can define both saved and temporary filters with individual search criteria for tasks and process instance lists.
...
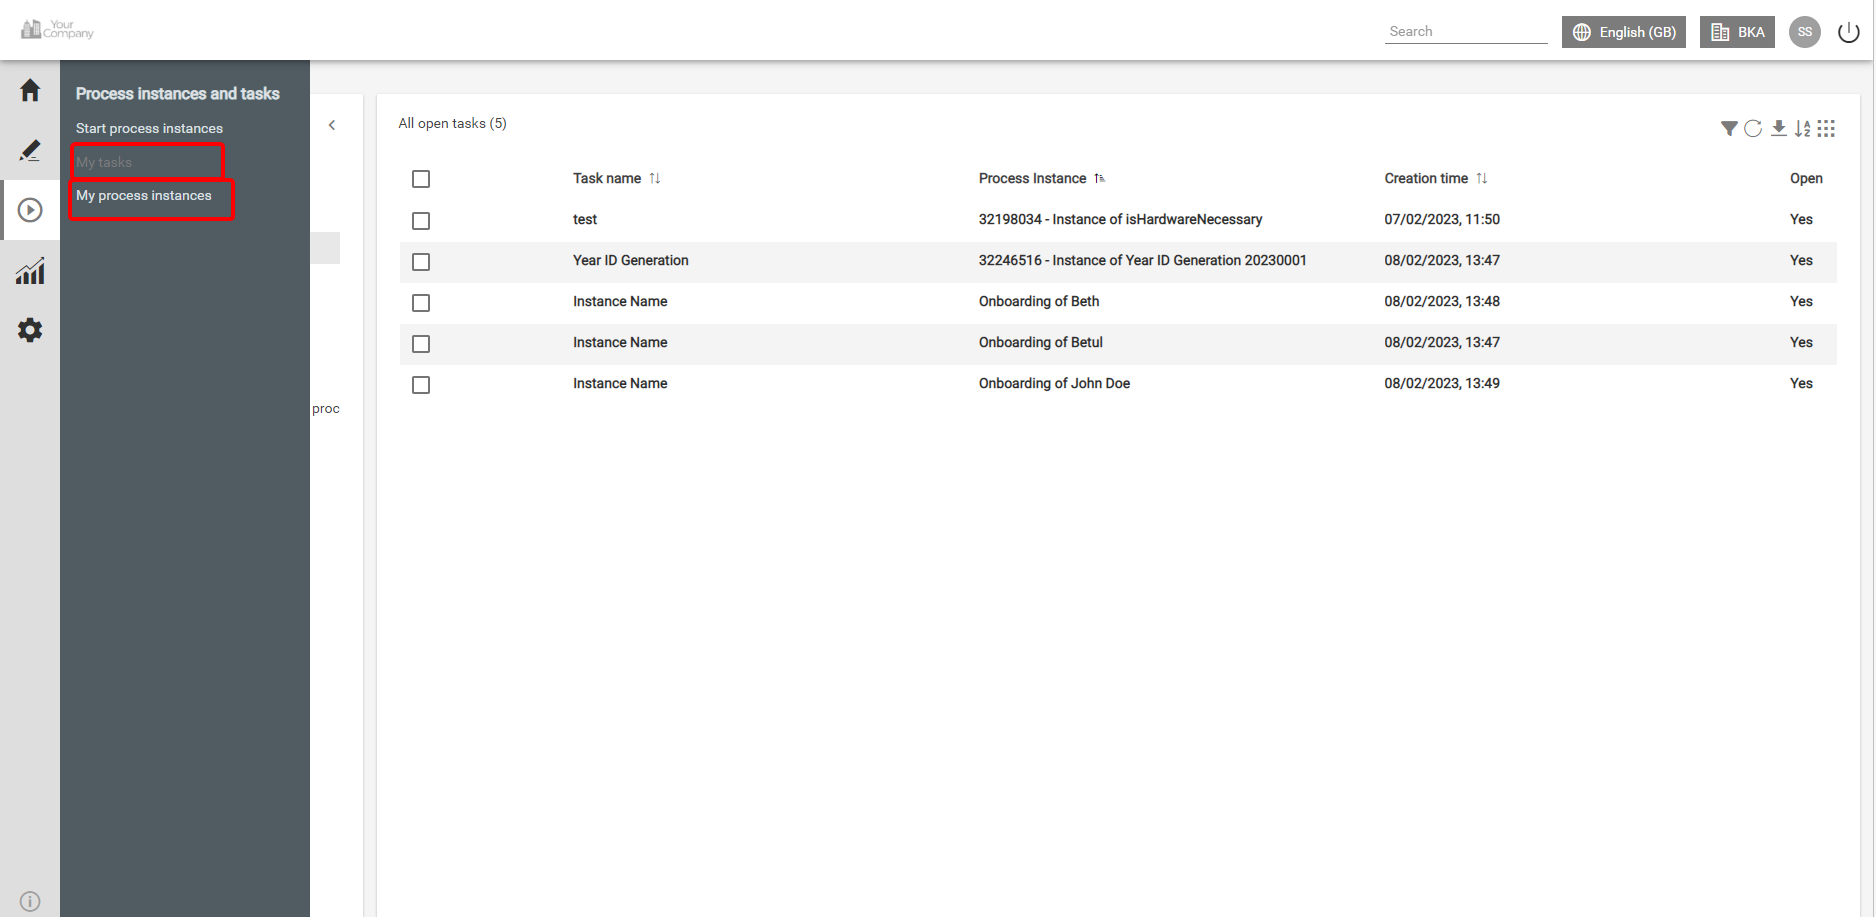
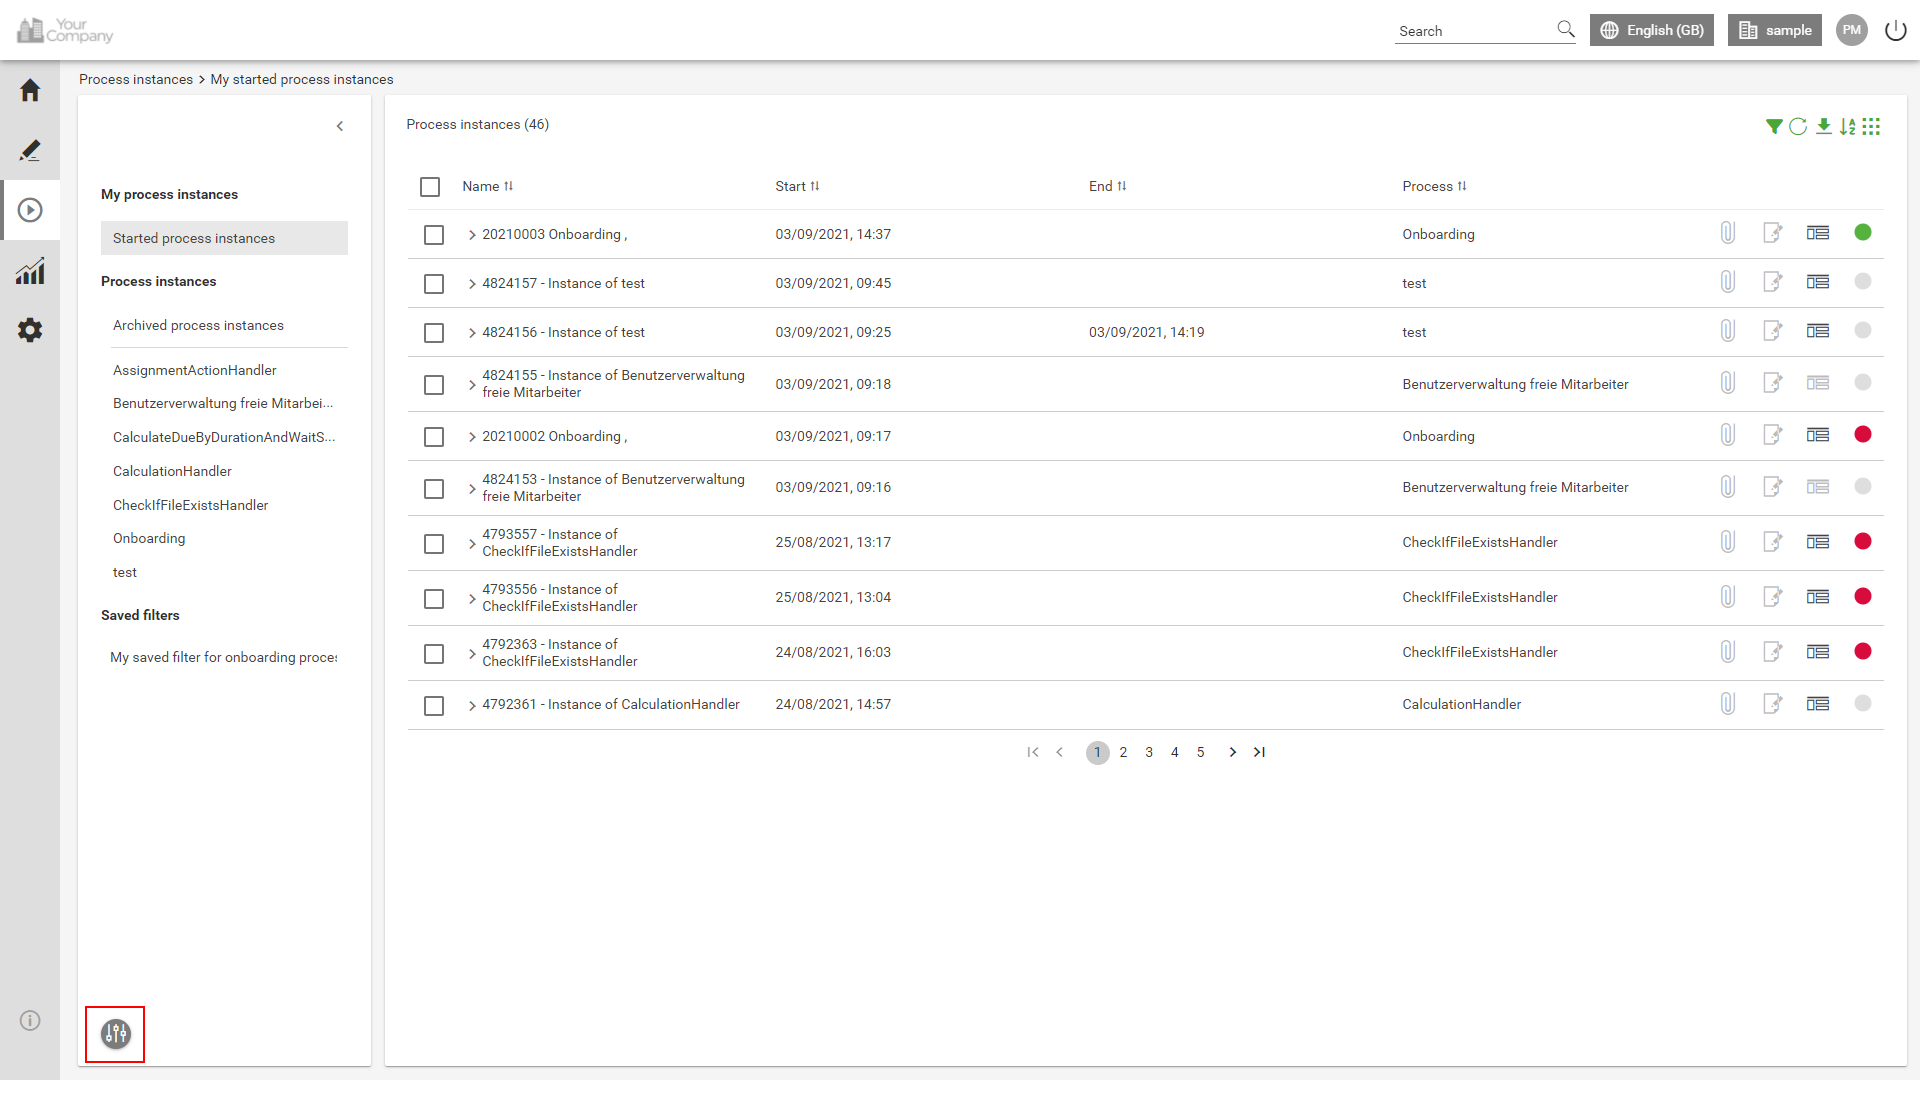
Click on the button 'Automate' in the Side-menu and select the option 'My tasks' or 'My process instances'.
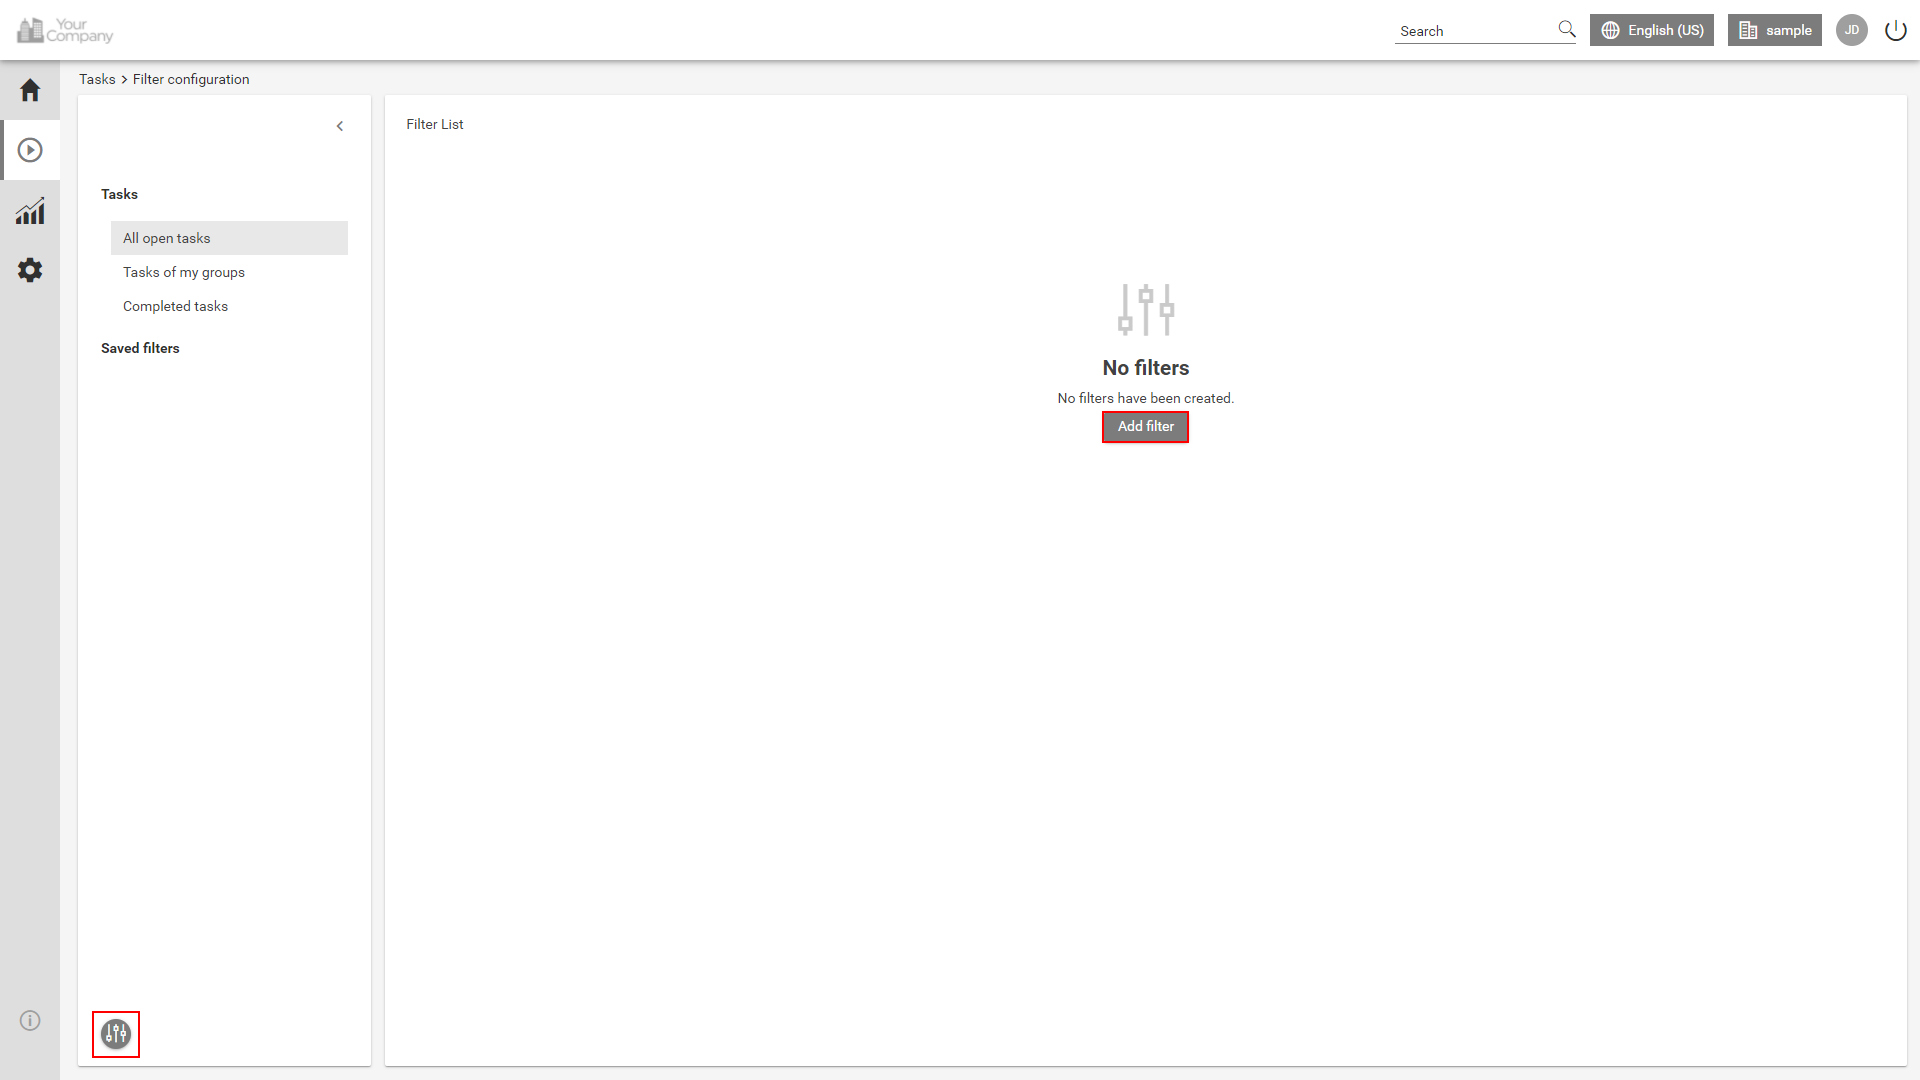
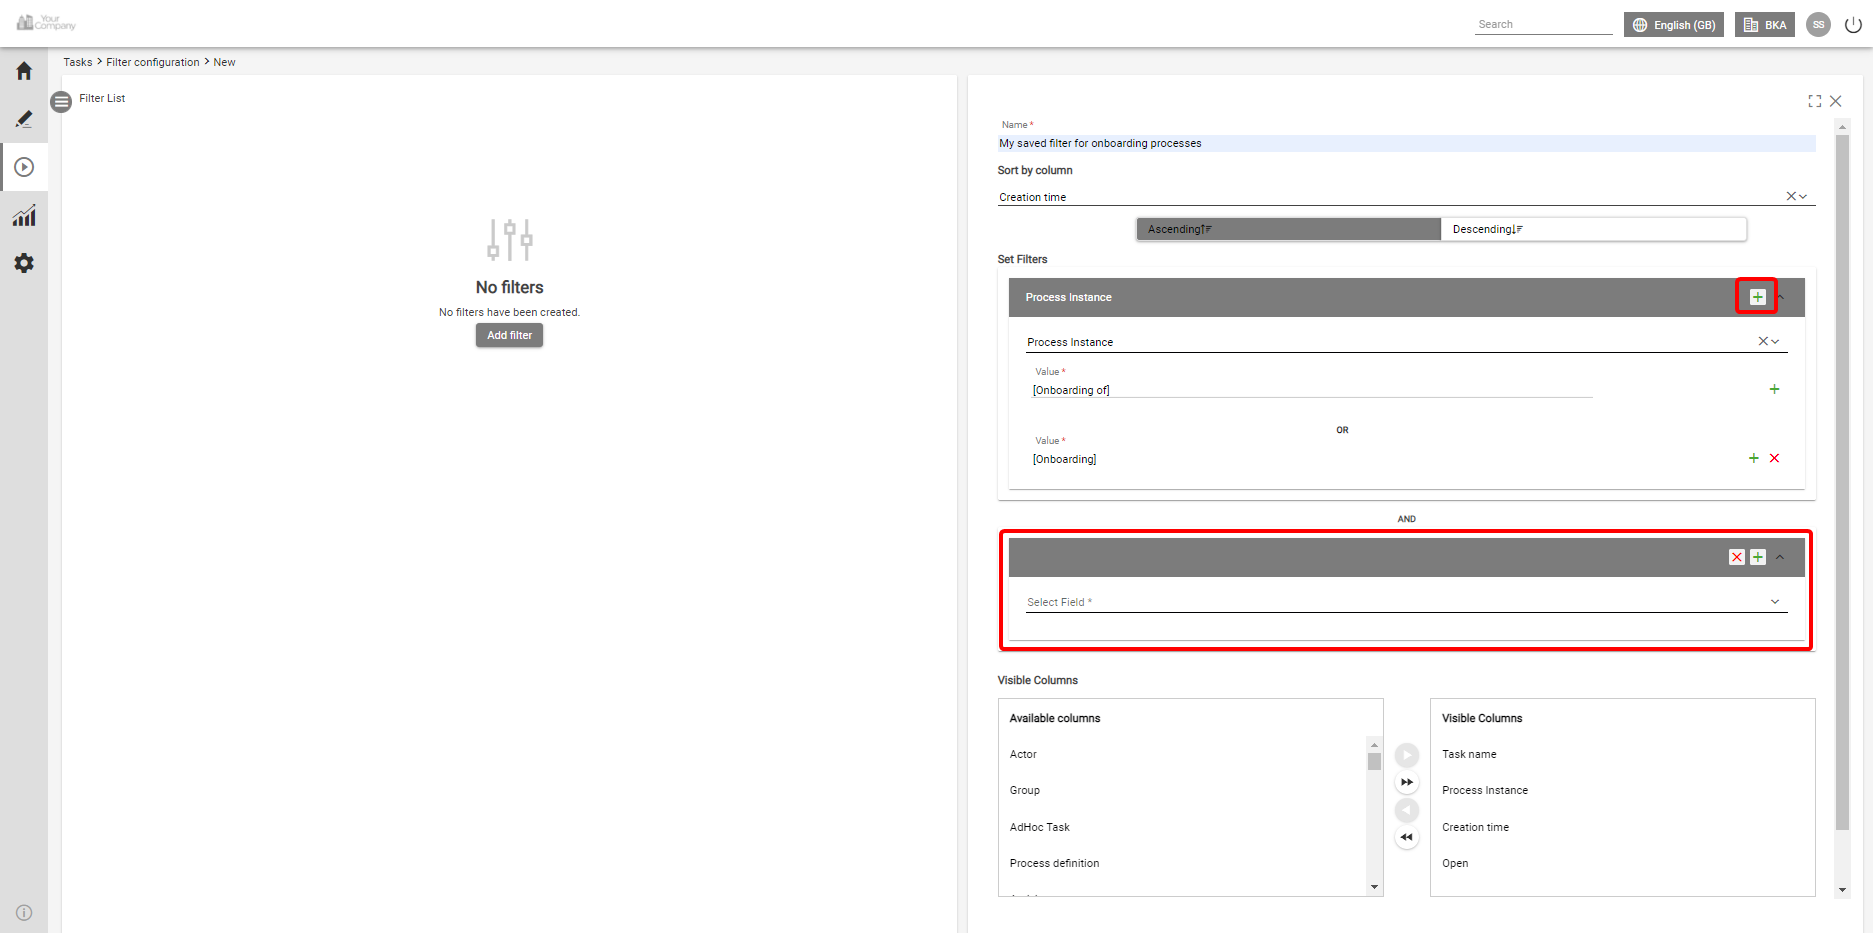
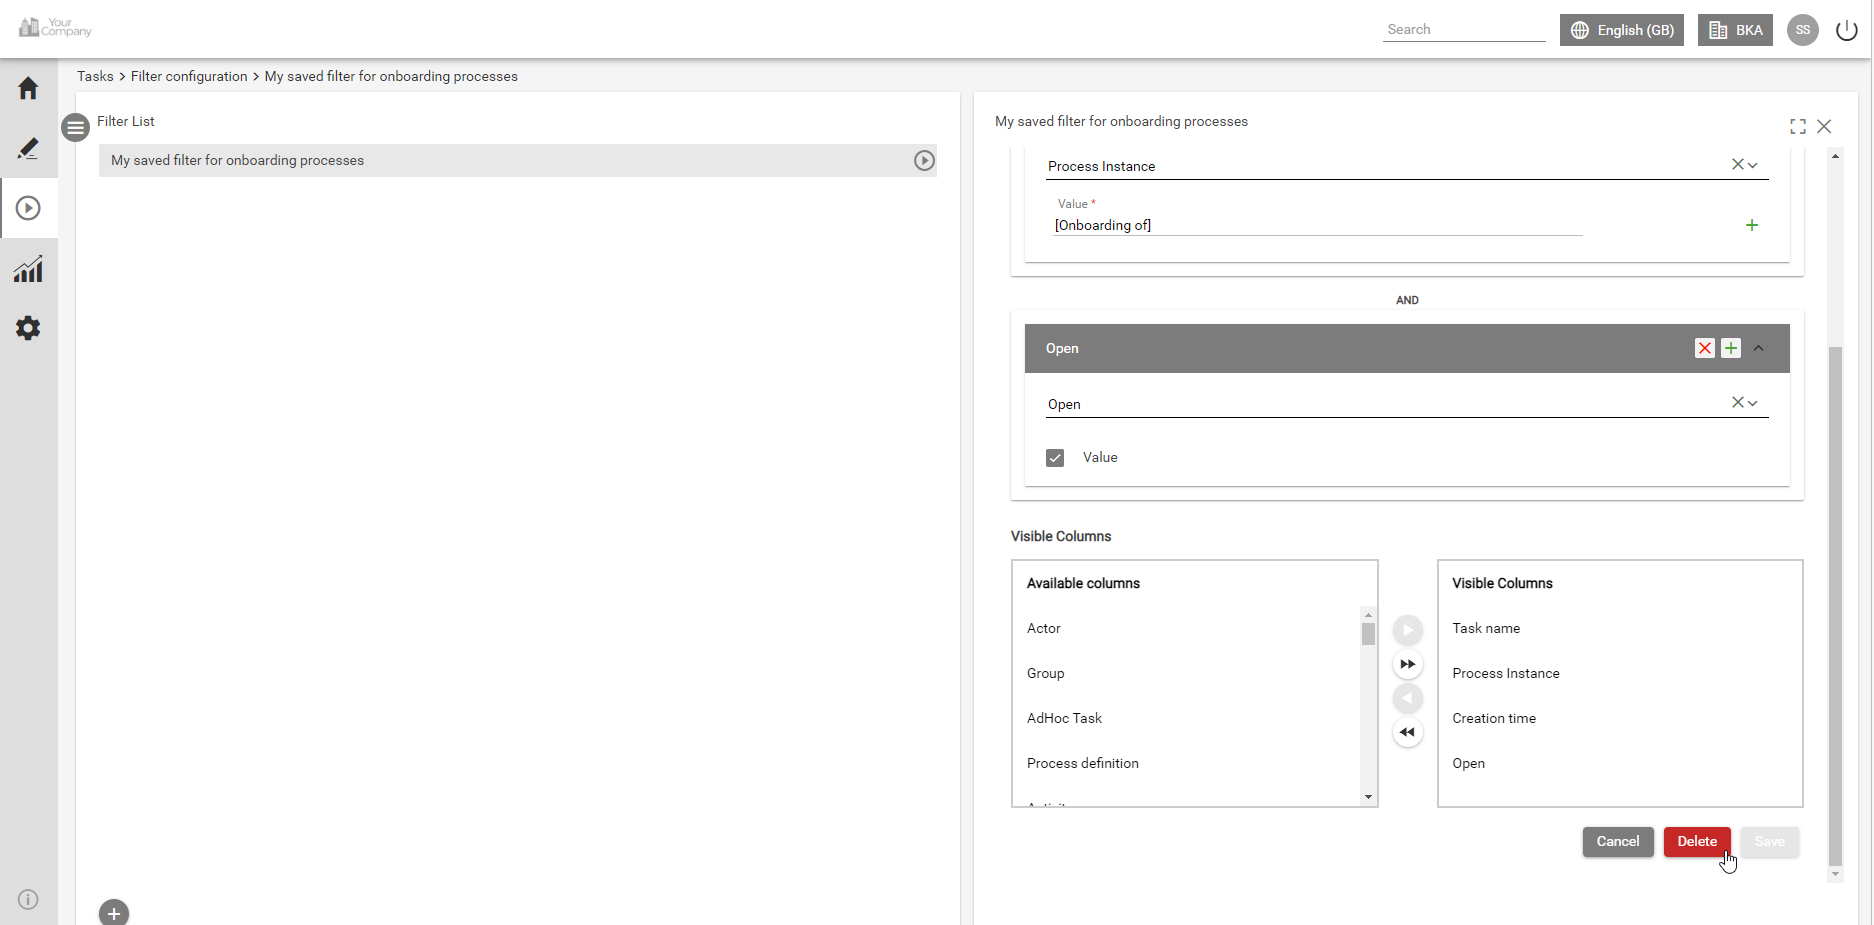
For creating saved filters, click on the 'configure saved filters' icon in the left side menu in the lower left corner. The filter list will be displayed. Click on the button 'Add filter' (if the filter list is empty) or on the plus button in the lower left corner.
On the right side, the detail area opens. Insert a descriptive filter name. Select a sorting column from the dropdown menu under the ‘Sort by column'. Choose sorting criteria as ‘Ascending’ or 'Descending’.
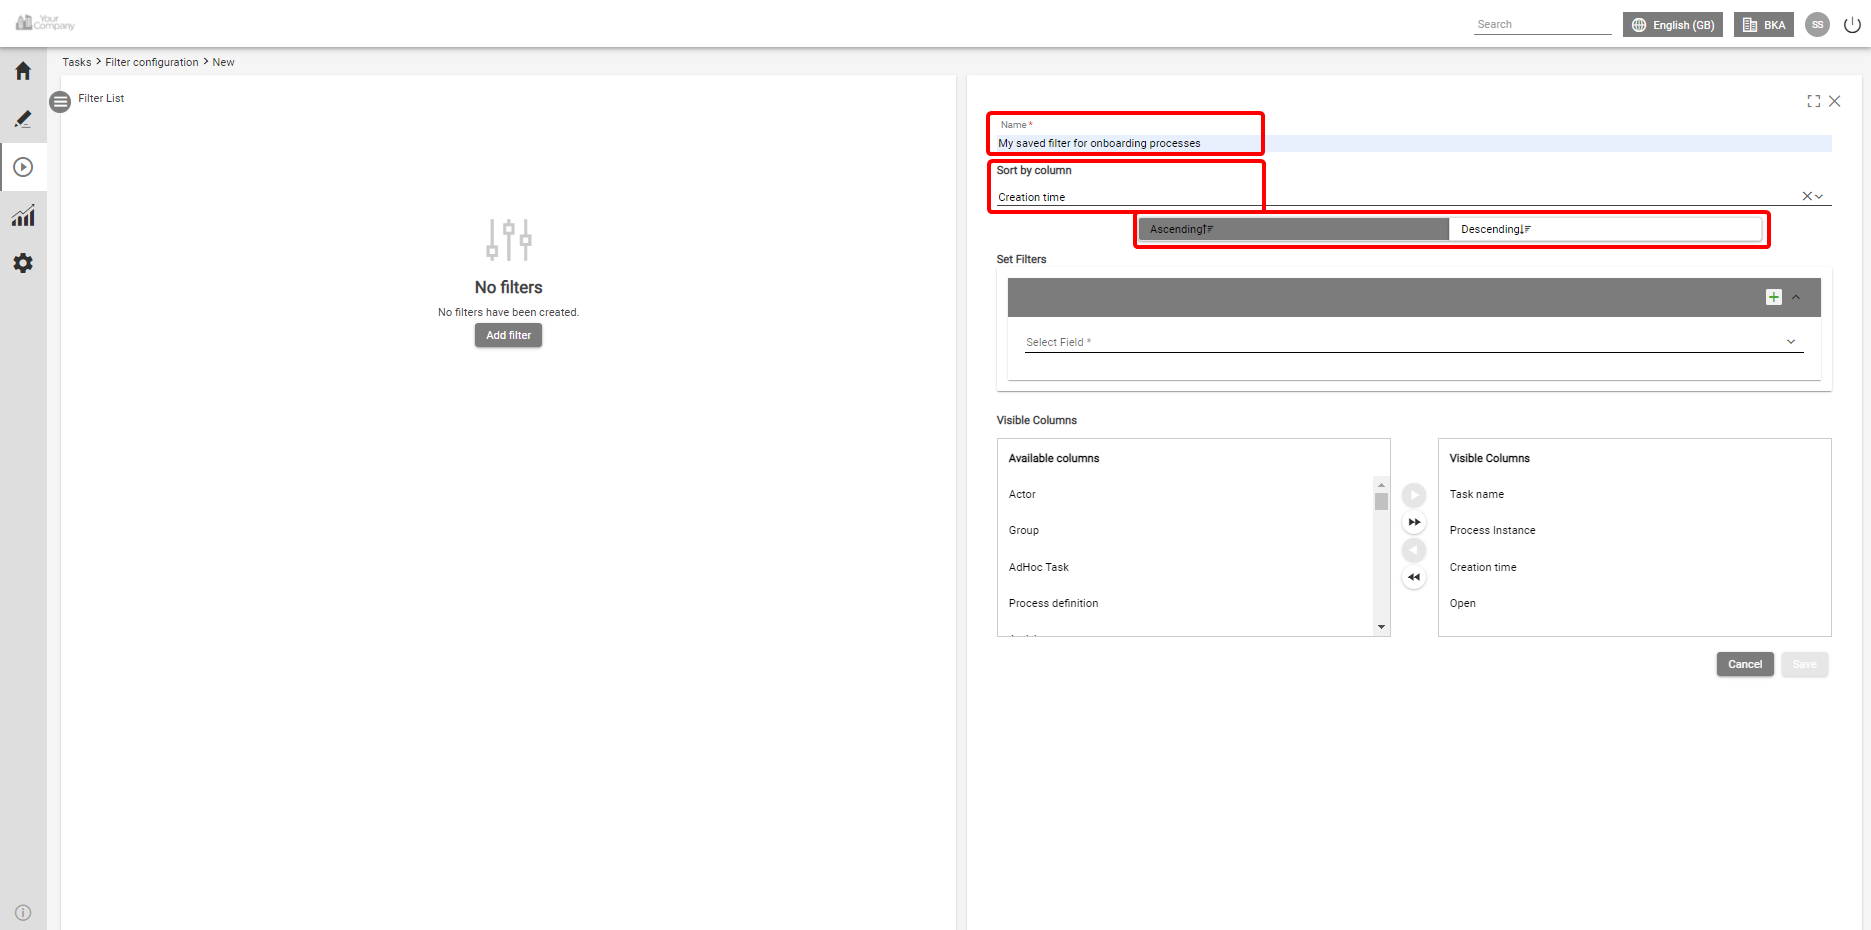
You can set multiple filters under the 'Set Filters' area. Choose the first criteria via the dropdown menu.
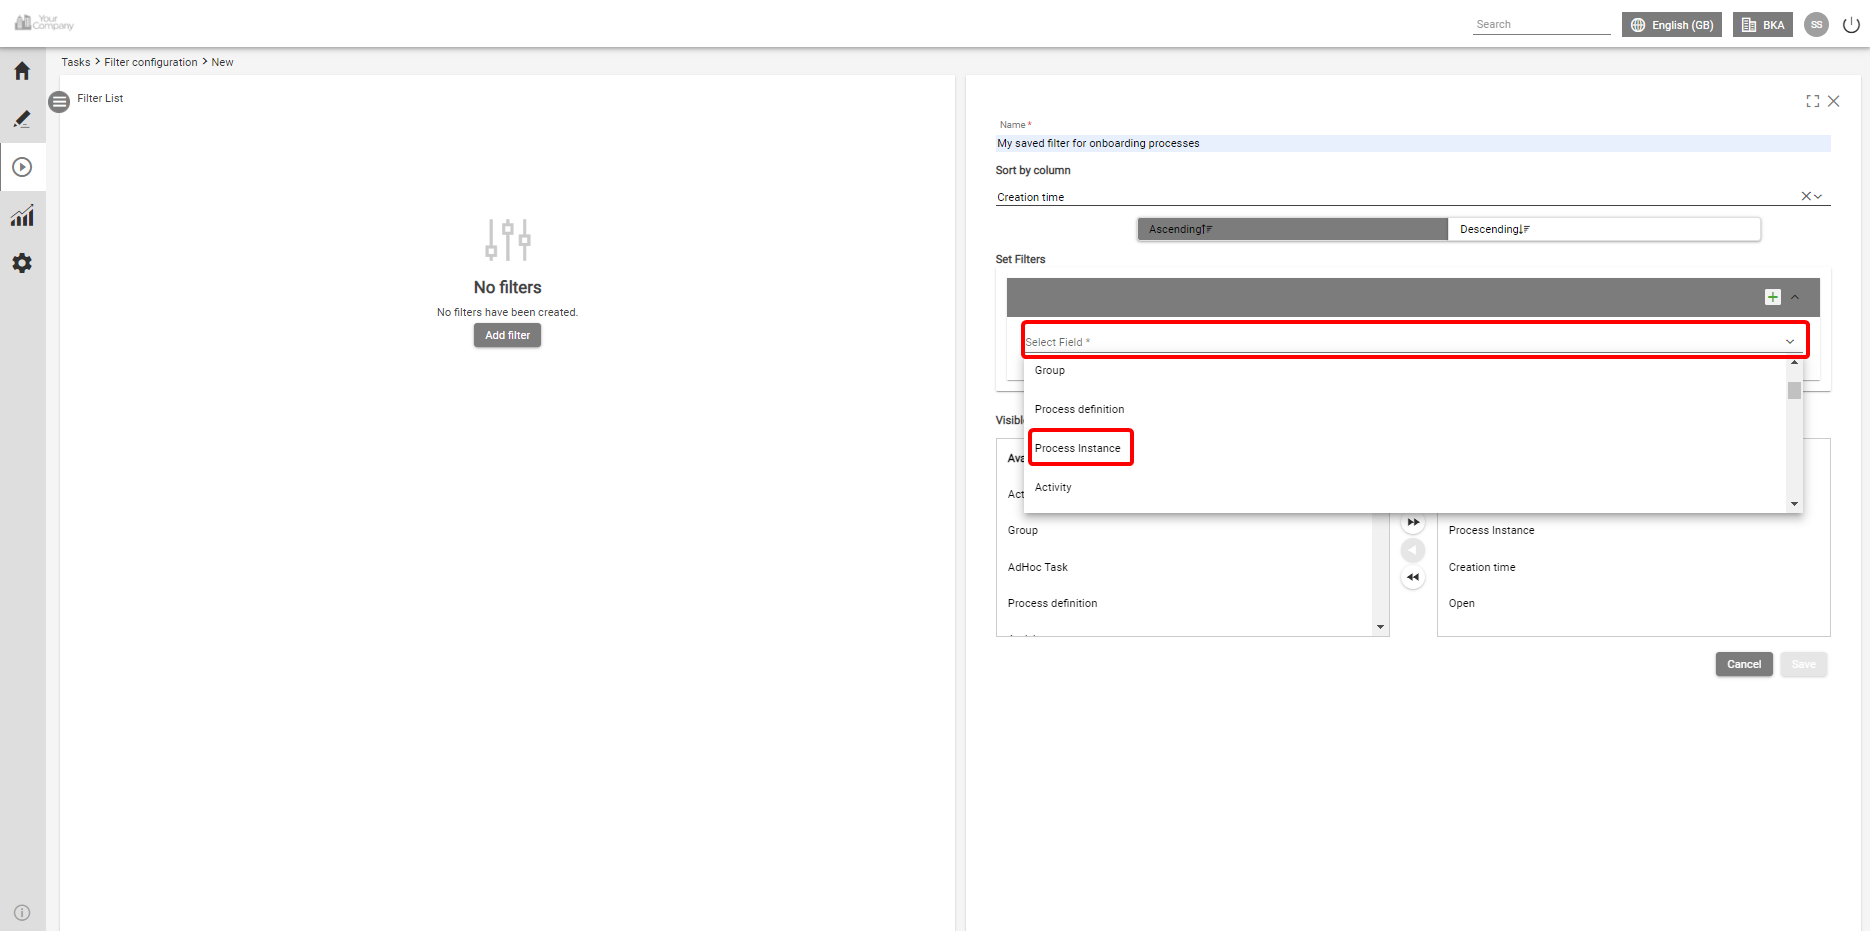
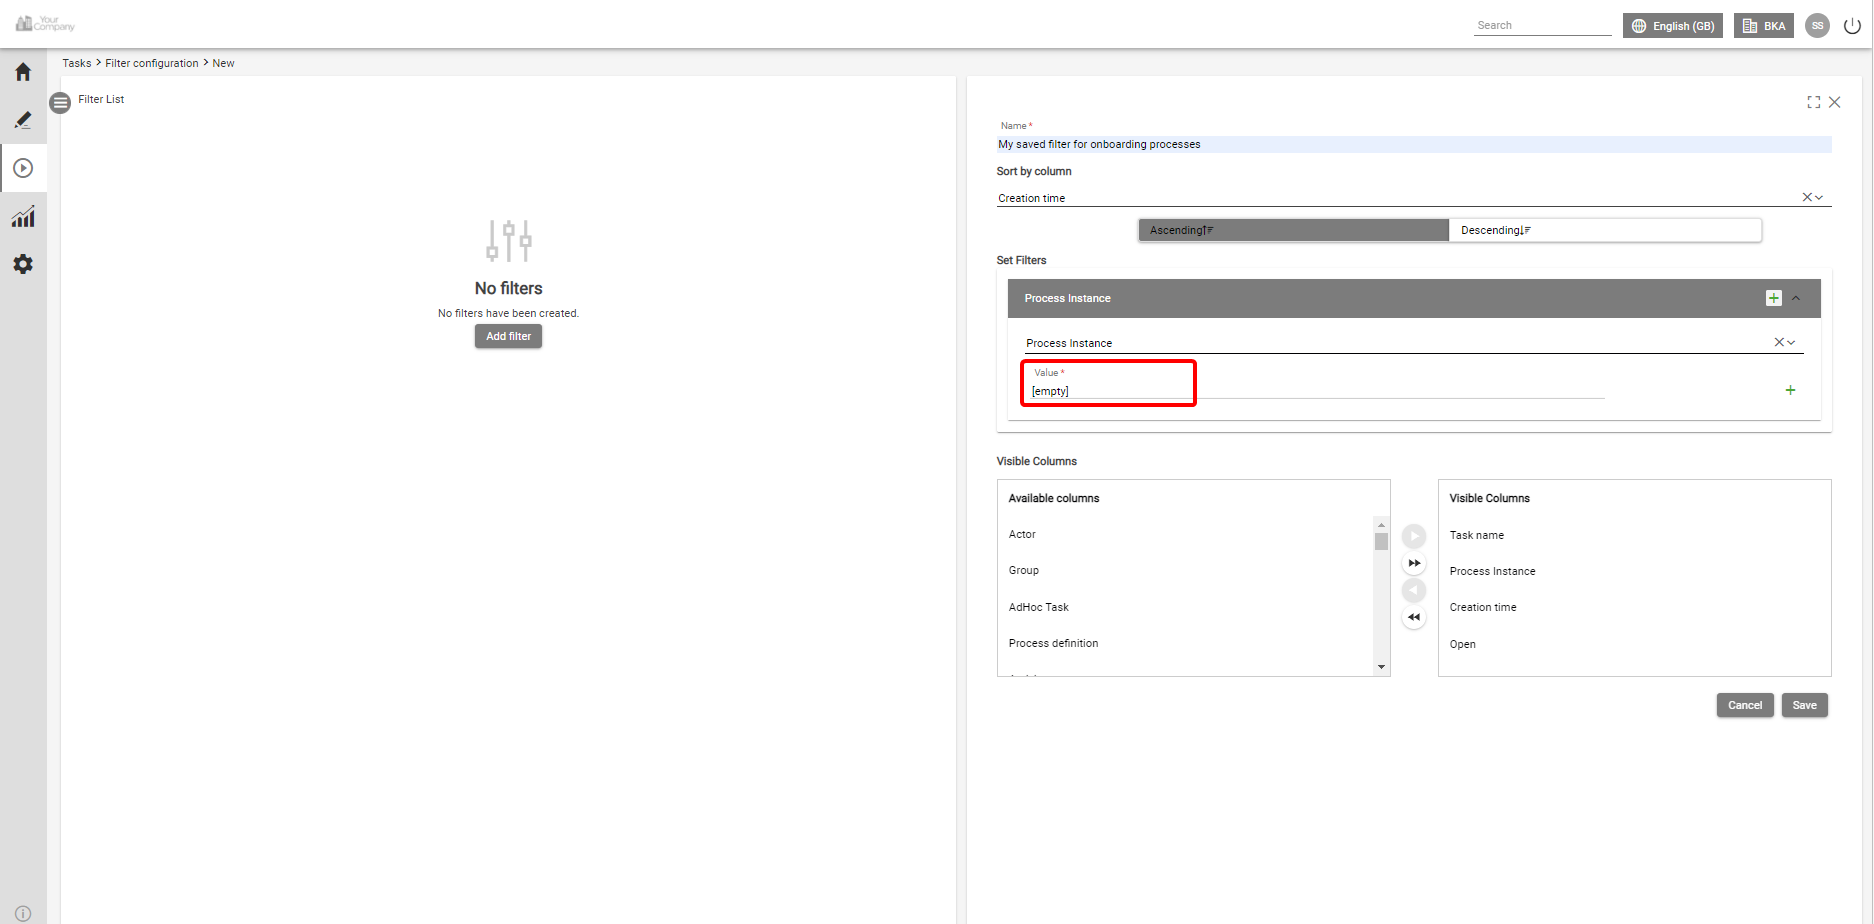
In our example we chose Process instance column. Enter the corresponding value inside the brackets for the choosen criteria. The casing of the value is ignored.
Additional value can be entered via the plus button(
). Second value can be entered inside the brackets(Status colour Red title 1.
). Additional values can be added and deleted via the 'x' button(Status colour Red title 2.
,Status colour Red title 3.
). These values follow the logical operator OR as indicated between the values. Each search criteria can be enhanced by inserting further values.Status colour Red title 4. 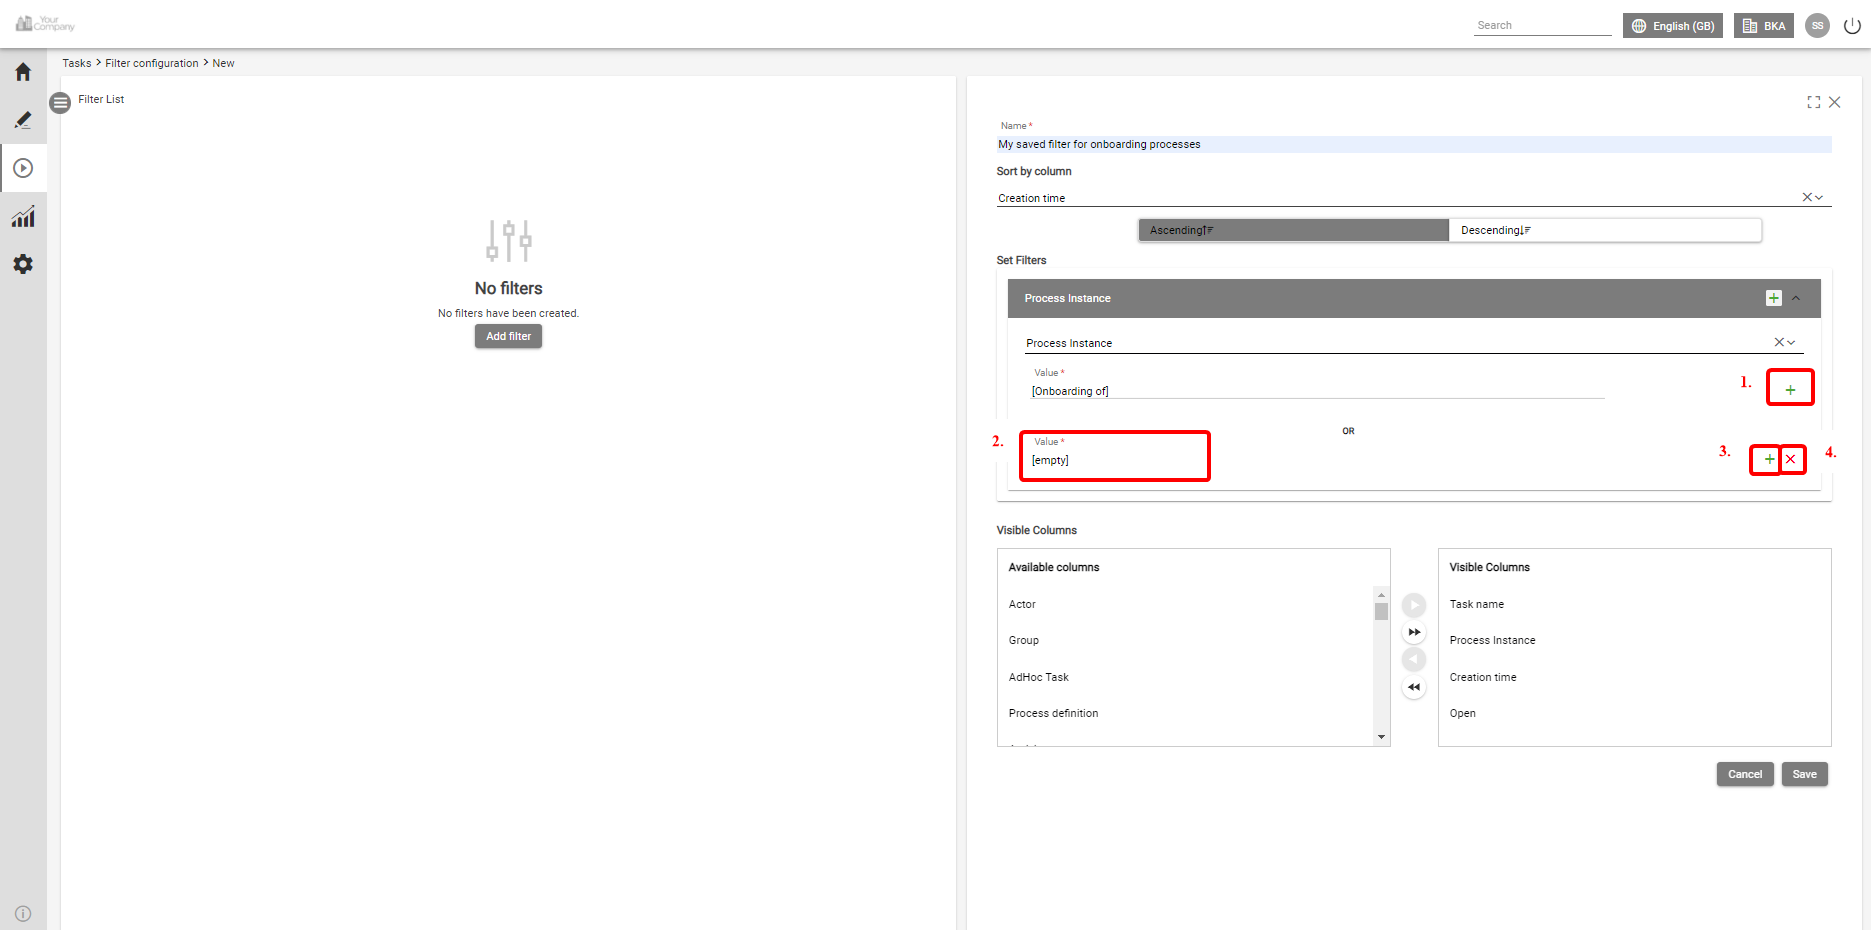
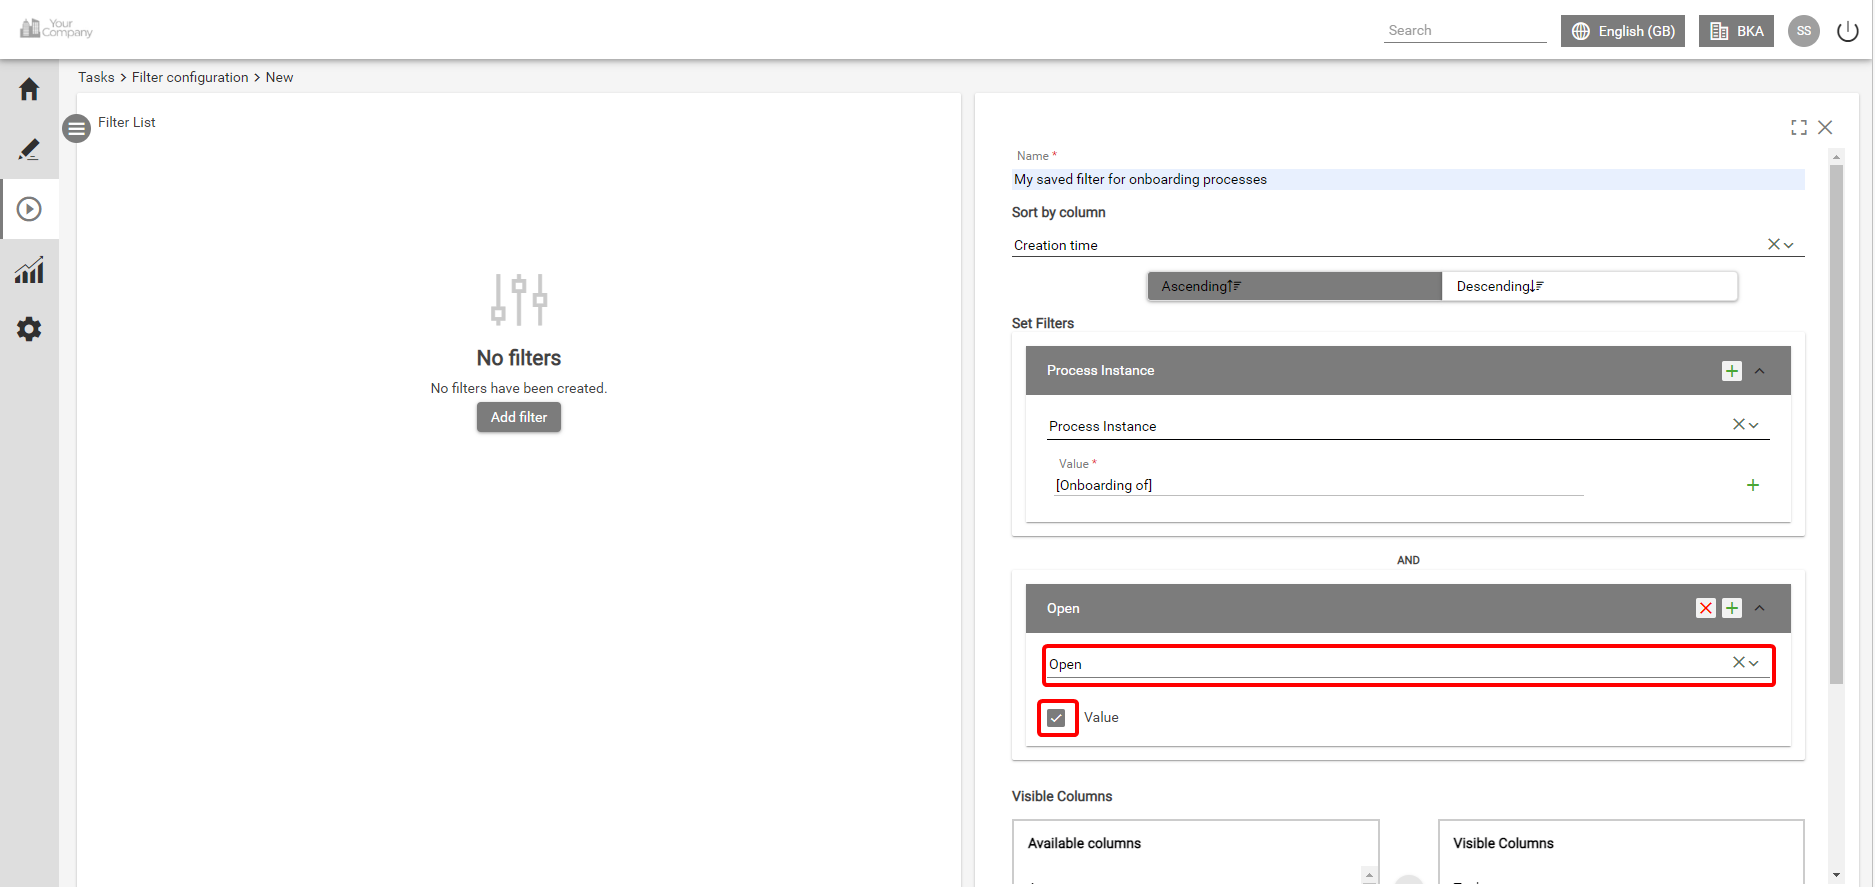
Add additional search criteria to further limit the search by clicking the plus symbol in the header of the first parameter. A supplementary input area opens. Select the required parameter and add the values. These values follow the logical operator AND.
For the second criteria column 'Open' is choosen via the dropdown menu. Only the open tasks are wanted to be listed, and Value box is is selected.
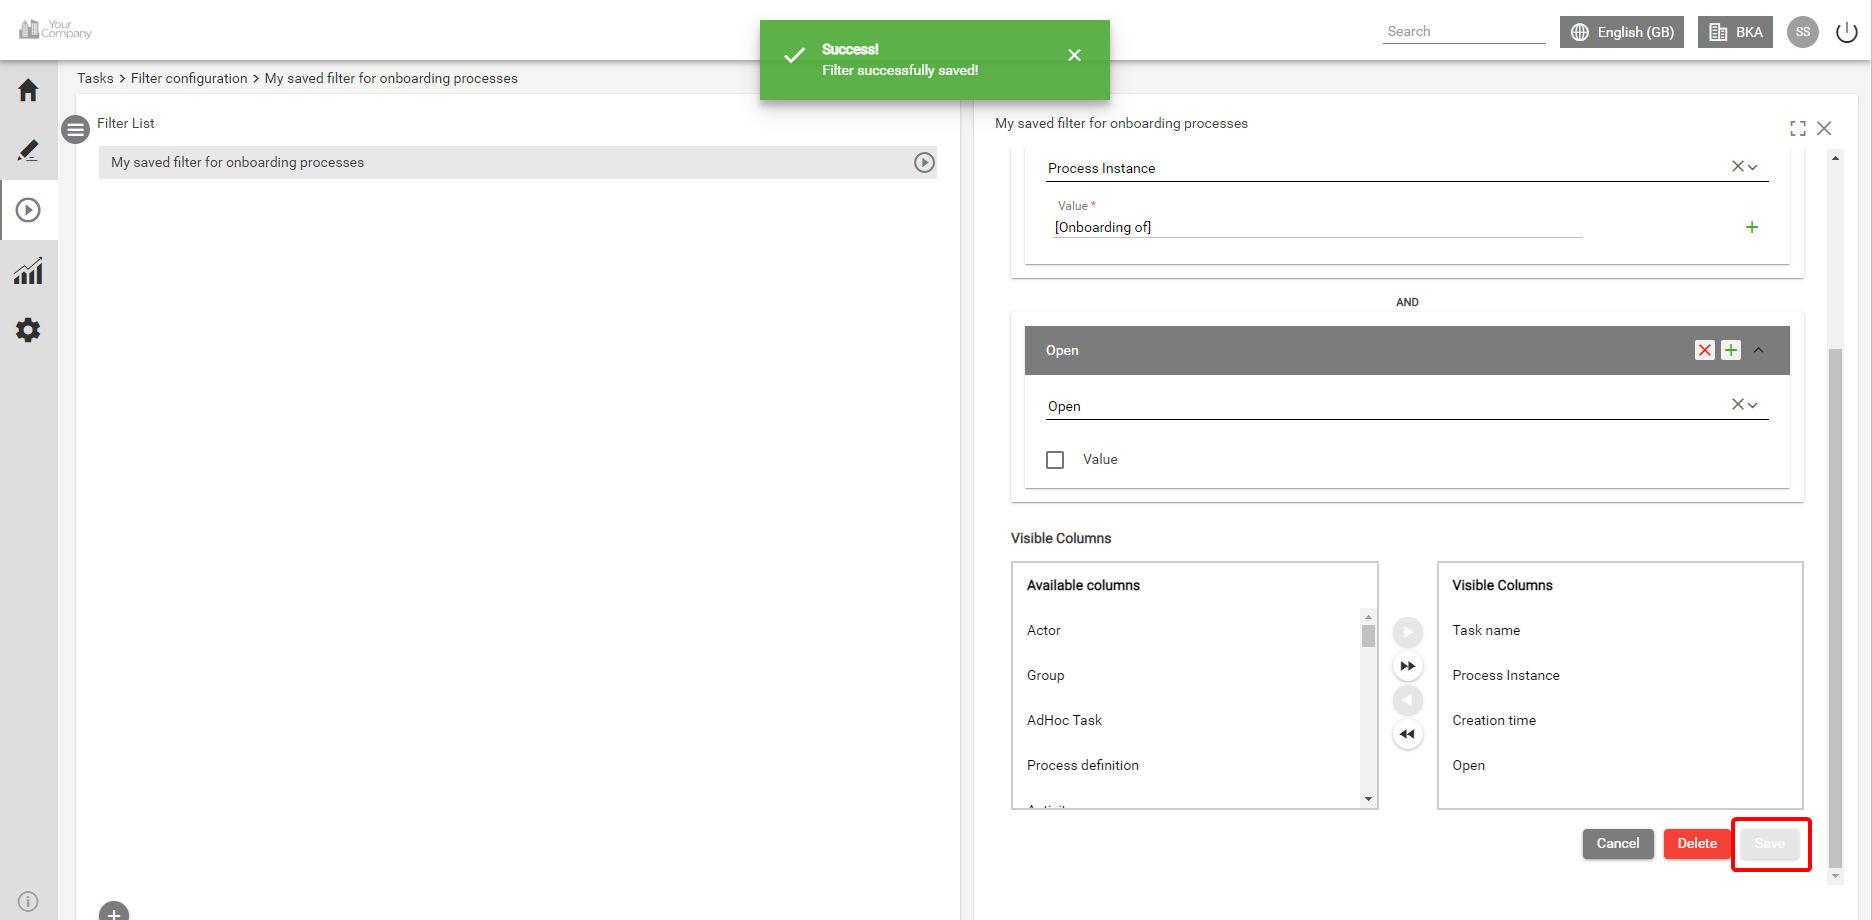
To add the filter, click on the button ‘Save’. A short message confirms the storage. The filter name is immediately displayed in the filter list and as a new menu item below the option Saved filters.
...
How to use a saved filter
...
Click on the button 'Automate' in the Side-menu and select the option 'My tasks' or 'My process instances'.
For changing a filter, click on the 'configure saved filters' icon in the left side menu in the lower-left corner.

Click on the corresponding filter name and the input area is displayed on the right side. Make the required changes. For more information about how to create filters, please regard chapter Create a saved filter. The changes are saved by clicking the button 'Save'. A short message confirms the storage.

...
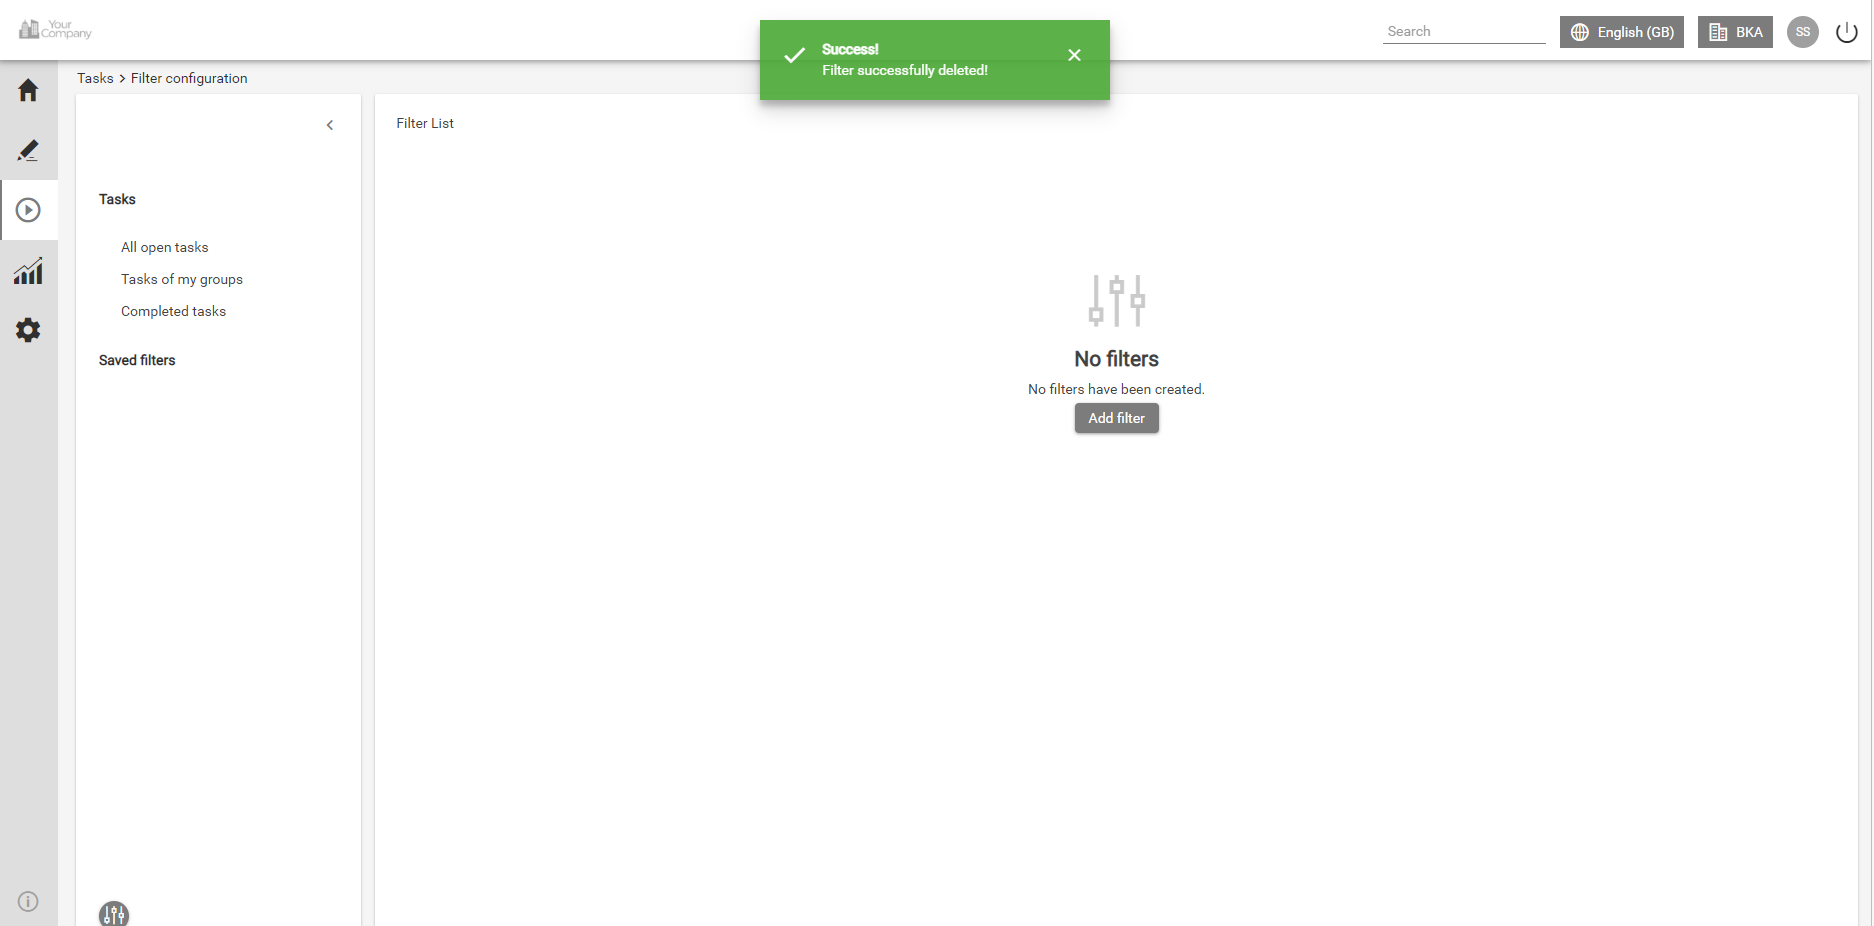
Delete a saved filter
To delete a filter, please do the following:
Click on the button 'Automate' in the Side-menu and select the option 'My tasks' or 'My process instances'.
For deleting a filter, click on the 'configure saved filters' icon in the left side menu in the lower-left corner.
Click on the corresponding filter name and the input area is displayed on the right hand side. Click on the button 'Delete' and confirm the query by clicking on the mark. A short message confirms the deletion. The filter name is immediately removed from the filter list and is no longer available as a menu item below the Saved Filter option.
| Info |
|---|
Please note that a deletion cannot be undone. |